|
Lesson
#11
Be Sharp
Last time we discussed how to build an attack. You will recall that an
important attacking element is the threat. By stringing threats together on each
successive move, you’ll be able to add more and more pressure until something
snaps. You’ll break through and earn a well-deserved victory.
Alertness is all-important. If you don’t seize the opportunity it will
likely vanish forever. And, your opponent may build an attack with threats of
her own. I highly recommend going over master games —
especially games from long ago — to learn how the
master’s sharp play brings marvelous victories.
Today’s game was played over 100 years ago between M. Porges and world champion
Emanuel Lasker (with black). Lasker loved to catch his napping opponents with a
surprise attacks. Let’s see how he does it.
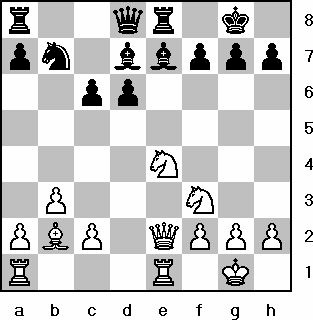
1. e4 e5 2.Nf3 Nc6 3. Bb5 Nf6 4. 0-0 Nxe4 5. d4 Be7 6. Qe2 Nd6 7. Bxc6 bxc6
8. dxe5 Nb7 9. b3 0-0 10. Bb2 d5! 11. exd6 e.p. cxd6 12. Nbd2 Re8 13. Rfe1 Bd7
14. Ne4?
|
|
|
Black to move
|
White sees no danger. After all, black’s pieces are not even past the
second rank. But watch how Lasker plays sharply. By using a threat with every
move he totally transforms the position.
14 … d5 (the first on many threats) 15. Ned2
The knight must retreat because 15. Ng3 Bb4 wins the exchange.
15. … Ba3
This powerful discovery produces two threats and limits white’s choice to a
single move.
16. Be5 f6 (Notice how sometimes the threat is a very simple move.
Simple, but effective.) 17. Qa6
Unable to respond directly to Lasker’s latest threat, white creates threats
of his own.
17. … fxe5 18. Qxa3 e4
White has avoided losing material. However, the threats keep coming. And,
compare Lasker’s pawns now to how they looked in the previous diagram. What an
improvement!
19. Nd4 Qf6!
Yes! Lasker gains time yet again and prepares to launch a kingside attack.
20. c3 Rf8
Having completed his work in the e-file, the rook teams up with the queen
on the f-file.
21. f3
White would prefer not to loosen up his kingside like this. But, what
else can he do? On 21. Rf1 Qg5 followed by 22. … Bh3 wins the exchange. Or the
unnatural 21. Re2 is met by c5 22. Nc2 Bg4 (or 22. … Qxc3 first).
21. … Qg5 (Never letting up on those threats) 22. Qc1 Nc5!
Now it’s the knight’s turn to get into the act. There’s now a strong
threat of winning the exchange with 23. … Nd3.
23. Nf1 Qg6
Lasker avoids the queen trade and simply repeats the threat of 24. … Nd3.
Also, 24. … exf3 is threatened as well. It’s a common mistake among juniors
to trade queens too readily. As you can see, Lasker’s queen is important to
the attack.
24. Re3 Nd3
With each move Lasker improves the position and coordination of his pieces.
On the other hand, white’s pieces look like they’ve been tossed in a
blender.
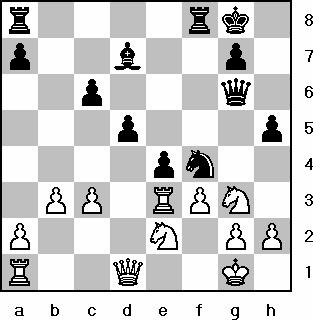
25. Qd1 Nf4 26. Ng3 h5!
The white knight won’t be able to stay on g3.
27. Nde2
|
|
|
Black to move
|
Desperate to remove the black knight, white temporarily weakens his f3
square. Lasker knows that strong positions often enable winning sacrifices. Ever
on the alert for the opportunity, he uncovers a very nice "sac" which
breaks open the kingside.
27. … Nxg2!
Now the king reluctantly takes a walk.
28. Kxg2 exf3+ 29. Rxf3 Bh3+! 30. Kxh3
30 Kf2 holds out longer. But after 30. … Bg4! Lasker’s attack rages
ahead and soon he’ll play h4 to dislodge the knight on g3. This is a fun
position to test your analyzing ability.
30. … Qg4+! 31. Kg2 Qxf3+ 32. Kg1 h4 33. Nh1
Or, you might prefer to end it with 33. Nf1 h3 followed by 34. … Qg2 mate.
33. … Qe3+ Resigns
For 34. Kg2 allows the black h-pawn to do the honors.
Being sharp is a lot more fun than being dull. You can learn how to be sharp
by going over games of the chess masters from long ago. May you too enjoy the
thrill of sharp play.
Home Page ·
More Lessons
(c) 2001 Ross Stoutenborough
|
