|
Lesson
#14
Pitching A Shutout
Just like a major league pitcher, sometimes the chess master has great
control. The opposition is formidable but is never able to overcome the master’s
grip. Bit by bit, with each move he improves his position. Avoiding wild play,
he prefers to squeeze his way to victory.
Yes, you can pitch a shutout in chess. It’s not easy, but very rewarding.
Here is a highly instructive shutout pitched by Vitaly Chekhover (white) against
I. Rudakovsky at Moscow in 1945.
1. d4 d5 2. c4 e6 3. Nf3 Nf6 4. Bg5 Be7 5. e3 0-0 6. Nc3 Nbd7 7. Qc2 c6 8.
Bd3 dxc4 9. Bxc4 Nd5 Black would like to trade some pieces. This common
theme in the Queen’s Gambit is designed to give black some maneuvering room.
10. Bxe7 Qxe7 11. 0-0 b5 Black grabs some space in the queenside.
However, this makes his c-pawn backwards. White now has a choice. He can play
tactically and try to win a pawn. Or, he can play positionally and try to gain
control of the c5 square. This is a matter of personal taste. Tactically minded
players might prefer 12. Nxd5 exd5 13. Bd3 Nf6 followed by 14. Qxc6 or Ne5.
However, after grabbing the c6 pawn white will be on the defensive.
White chose the quieter plan and played 12. Be2 a6 13. Ne4 Bb7 14. Ne5! Very
nice! White assures control of the c5 outpost by removing the defender. Also,
this entombs black’s bishop. 14. … Rac8 15. Nxd7 Qxd7 16. Nc5 Qc7
17. Rfd1 Rcd8 18 Rac1 Bc8 19. Qe4!
With a good grip on the queenside, white now strives to control the
center by preventing 19. … e5. Black chased the queen with 19. … Nf6
but after 20. Qh4 he shied away from 20. … e5 because 21. Qg3
pins the weak pawn. After 21. … Rfe8 22. Bf3 black is hard pressed to guard
the c6 and e5 pawns.
Good positional chess is often supported by tactics hiding in the background.
This point is often misunderstood by people who think positional chess is dull.
They are missing the underlying beauty of the tactics. Sometimes your best
combinations are never actually played.
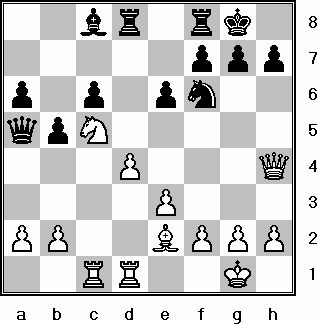
So, giving up on a break in the center and with the white queen on the
kingside, black decides to attack on the other wing. 20. … Qa5
|
|
White to move
|
Notice how white, a master of
control, quietly responds to these threats and adds pressure at the same time. 21.
a3 b4 22. a4 Nd7 23. b3 Nxc5 24. Rxc5 Qb6 25. Rdc1 Bb7 26. a5!
Oh, it’s fun to squeeze! Now the black queenside pawns are locked targets
and the queen is driven back. 26. … Qa7 27. Bd3!
A wise choice. Many players would go collect the black b-pawn now with 27
R1c4. But a single pawn does not insure victory. White wants more and forces a
new weakness on the kingside.
Which pawn should black push? 27. … h6 falls into 28. Qe4 g6 29. Rh5!
Kg7 30. Qe5+ and if 30. … Kh7 31. Qg5! is crushing. Notice how black’s queen
and bishop are uselessly stuck on the queenside.
27. … g6. 28 Qf6! Squeeze! White now plans to march his h-pawn
to h6 and deliver Qg7 mate. Black must dislodge the queen. But, how? The only
way is to get his queen to d8. So he clears the square with 28. … Rd6 Now
white tempts a rook to occupy the d8 square instead with 29. Qe7 Rfd8. Now
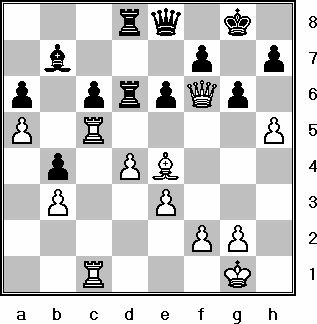
the squeeze continues with 30. h4 R8d7 31. Qf6 Qa8 32. Be4 Qe8 33. h5 Rd8
|
|
White to move
|
The pressure is enormous! But, how does white breakthrough? Did you notice
how overworked the black queen is? She’s guarding the c6 pawn, the rook on
d8 and has to keep an eye on possible mate threats on g7. Seeing that this is
too much for her to handle, white plays 34. Bxc6! Bxc6 35. h6! threatening
mate in one.
Black could try a last stab effort to break free with 35. … Qf8. 36
Rxc6 e5. It’s not enough, though. For example, 37. Rxd6 Rxd6 38 Qxe5 Re6 39.
Rc8 forces a king and pawn endgame with two extra pawns.
Instead, black’s king takes a walk with 35. … Kf8 In this
final inning white pitched 36. Rxc6 Rxc6 37. Rxc6 He foresaw that 37. …
Qxc6 38. Qxd8+ Qe8 39. Qd6+ followed by 40. Qxa6 would soon produce another
queen.
So, in desperation, black guards his second rank with 37. … Rd7 This
prevents 38. Rc7 followed by 39. Qh8 mate. But, this move weakens the back rank.
White struck out the black queen with 38. Rc8! Finding no way to save her
from 38. … Qxc8 39. Qh8+ Ke7 40. Qxc8, Black resigned.
Imagine white’s thrill upon finishing this great game! He controlled the
board from start to finish against a worthy opponent. You might even say
"no hits, no runs and no errors."
Home Page ·
More Lessons
(c) 2001 Ross Stoutenborough
|
